‘chrome://net-internals/#dns‘ is a hidden page in the Google Chrome browser that provides advanced networking information and diagnostic tools. The page allows users to view and manage DNS (Domain Name System) settings and data, including host cache, socket pools, and DNS queries.
As we browse the internet, our computer stores DNS (Domain Name System) records in its cache to make future requests faster. However, outdated or incorrect records can cause website loading issues. To fix this, we can clear or flush the DNS cache using the chrome://net-internals/#dns tool in Google Chrome. In this article, we’ll go through the process of clearing or flushing the DNS cache using this tool.
Google Chrome Clear or flush the DNS cache using chrome://net-internals/#dns
The following code is generated to flush the DNS cache on Google Chrome:
- Launch a new tab.
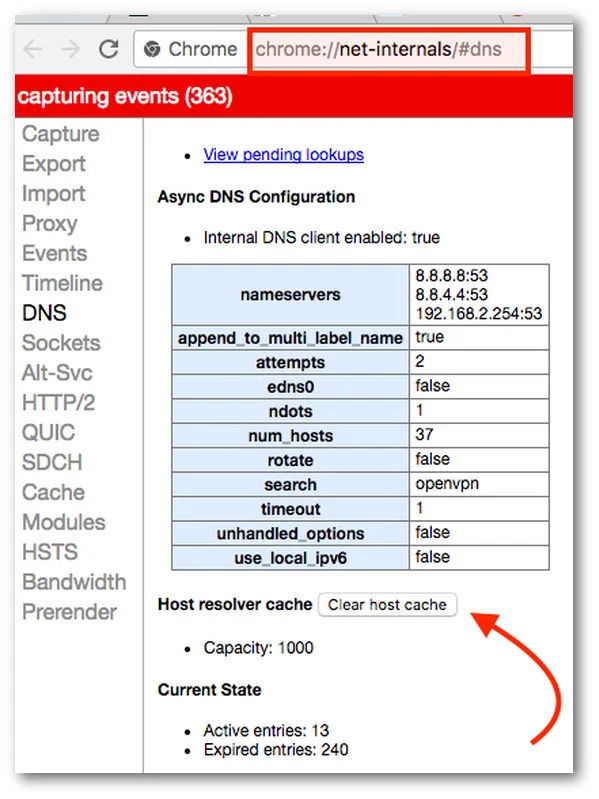
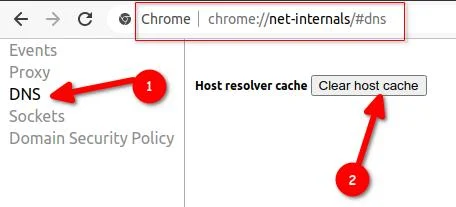
- Enter the following link into the search box: chrome://net-internals/#dns
- Select “Clear host cache” from the menu.
- Once DNS is flushed, you’re done.
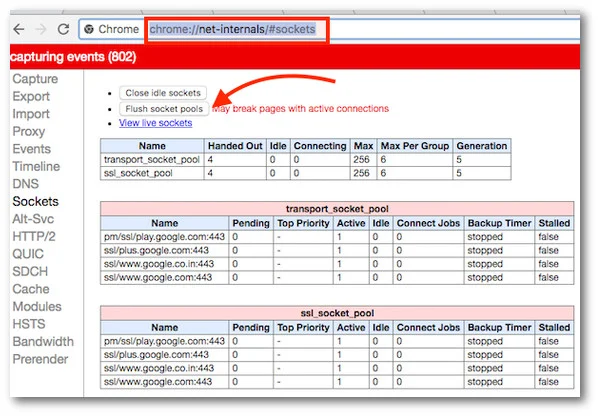
- Open a new tab and type the URL: chrome://net-internals/#sockets
- Select the “Flush socket pools” option.
- Exit the Google Chrome window.

From the latest version of Google Chrome:
You may also need to flush socket pools:
- Create a new tab and enter the following into the search box: chrome://net-internals/#sockets
Click on the “Flush socket pools“:
What is the DNS Cache?
The DNS cache is a temporary database that stores information about the domain names and their corresponding IP addresses that have been recently accessed by a device or a network. When a user visits a website, the DNS cache of their device or network saves the IP address of that website to provide faster access to it the next time the user visits it. The DNS cache reduces the time it takes to resolve domain names to their IP addresses and speeds up internet browsing.
What exactly is DNS cache Flushing?
DNS cache flushing is the process of clearing the DNS cache of a device or network. This process erases all the stored DNS cache entries, forcing the device or network to query the DNS server for the IP address of the website the next time it is accessed. Flushing the DNS cache can be helpful in resolving some internet connectivity issues or to ensure that the device or network is using the latest IP address information for a website. It can also be used to clear any potentially corrupted or outdated DNS cache entries.
Clearing or flushing out DNS cache on MS-Windows 7/8/10/11
To clear or flush the DNS cache on MS-Windows 7/8/10/11, follow these steps:
- Open the Command Prompt: Click on the Start Menu and search for “cmd“. Right-click on Command Prompt and select “Run as Administrator”.
- Type the following command and press Enter: “ipconfig /flushdns“. This will clear the DNS cache on your computer.
- You should see a message that says “Successfully flushed the DNS Resolver Cache“.
- Close the Command Prompt and restart your computer for the changes to take effect.
Note: If you are using a VPN, you may need to disconnect from the VPN before flushing the DNS cache.
Clearing/flushing out DNS cache on Linux
To clear/flush out DNS cache on Linux, you can use the systemd-resolve command:
- Open your terminal.
- Type the following command and press enter:
sudo systemd-resolve --flush-caches - This command will flush out the DNS cache on your Linux system.
Alternatively, you can also use the nscd command:
- Open your terminal.
- Type the following command and press enter:
sudo service nscd restart - This command will restart the Name Service Cache Daemon and clear the DNS cache on your Linux system.
Note: The above commands may require root/administrator privileges.
Flushing out DNS cache on Apple macOS
To flush the DNS cache on an Apple macOS device, follow these steps:
- Open the Terminal application. You can find it in the Applications folder or by searching for it in Spotlight.
- Type the following command and press Enter: sudo killall -HUP mDNSResponder
- You will be prompted to enter your administrator password. Enter it and press Enter.
- The DNS cache on your macOS device will be flushed, and you should see a message indicating that the process was successful.
Note: In some older versions of macOS, the command may be slightly different. For example, in macOS Sierra and earlier, the command is:
sudo killall -HUP mDNSResponder;sudo killall mDNSResponderHelper;sudo dscacheutil -flushcache
This command will still flush the DNS cache on your device.
How to verify dns flushed or not
o verify whether DNS cache has been flushed or not, you can perform the following steps:
- Open Command Prompt on Windows or Terminal on macOS/Linux.
- Type the command “ipconfig /flushdns” on Windows or “sudo killall -HUP mDNSResponder” on macOS/Linux and press enter.
- Wait for the command to execute and the cache to be cleared.
- Type the command “ipconfig /displaydns” on Windows or “dscacheutil -cachedump -entries Host” on macOS/Linux and press enter.
- If the cache has been successfully cleared, there should be no entries displayed in the output.
You can also visit a website and check if the website is loading properly or not. If the website loads properly, it means that the DNS cache has been cleared and the new DNS information has been obtained from the DNS server.
Conclusion
Clearing or flushing the DNS cache using chrome://net-internals/#dns on Google Chrome is a simple process that can help resolve website loading issues. This tool allows you to view and clear the DNS cache and check if any records are causing website loading problems. By following the steps outlined in this article, you can easily clear or flush the DNS cache on Chrome and enjoy a faster and smoother browsing experience.