Are you tired of being restricted to using iTunes only on your Apple devices? Well, fear not, as we have a solution for you! With a few simple steps, you can download and install iTunes on your Chromebook, and have access to all your favorite music and media content, no matter where you are.
It’s no secret that Chromebooks are growing in popularity due to their affordability, versatility, and user-friendly interface. However, the inability to access iTunes has been a pain point for many users. But fear not, as we are here to guide you through the process of downloading and installing iTunes on your Chromebook, and finally enjoying your favorite music and media content on your Chromebook, just like you do on your Apple devices.
If you’re looking for ways to enhance your Chromebook experience, check out our guides on Chrome Flags, which allow you to customize and improve your browsing experience, and changing your wallpaper with custom designs.
In this step-by-step guide, we’ll walk you through the process of enabling Linux on your Chromebook, installing Wine, and finally, downloading and installing iTunes on your Chromebook. So, sit back, grab a cup of coffee, and let’s dive into the wonderful world of iTunes on your Chromebook.
Requirements for Installing iTunes on Chromebook
Before installing iTunes on Chromebook, there are some technical requirements that need to be met. Firstly, the Chromebook needs to be running Chrome OS version 70 or later. Secondly, the Chromebook needs to have an Intel processor and support Linux apps. Lastly, the Chromebook needs to have at least 4GB of RAM and 500MB of free disk space.
To download and install iTunes on Chromebook, you will also need to download two additional components: Wine and PlayOnLinux.
How to Download and Install iTunes on Chromebook
Step 1: Enable Linux on Chromebook
The first step in installing iTunes on a Chromebook is to enable Linux. To do this, follow these steps:
- Click on the time in the bottom-right corner of your screen.
- Click on the gear icon to open the Settings menu.
- Click on “Advanced” to expand the options.
- Click on “Developers”.
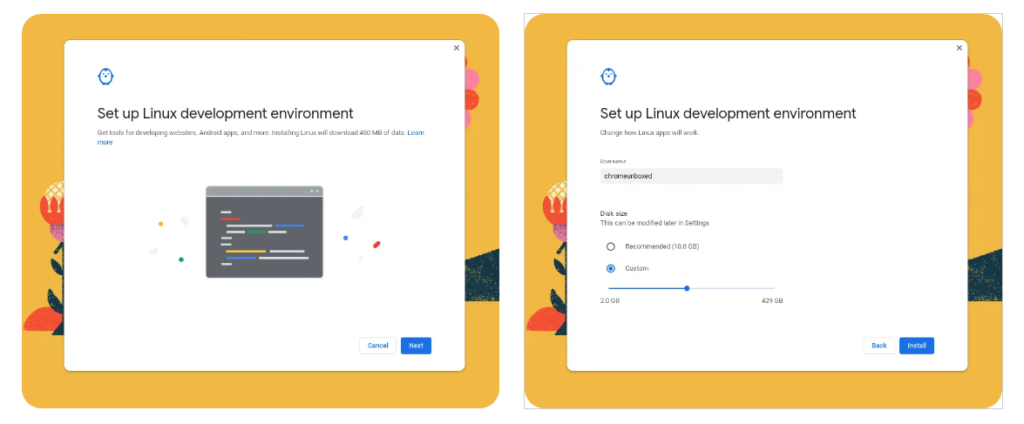
- Toggle the switch for “Linux development environment” to the “on” position.
- Follow the prompts to download and set up Linux on your Chromebook.
Here’s an image to help you out:
Step 2: Install Wine
Once Linux is enabled on your Chromebook, you’ll need to install Wine. Wine is a compatibility layer that allows you to run Windows applications on Linux. Here’s how to install it:
- Open the Terminal app on your Chromebook.
- Type the following command: sudo apt-get update
- Press Enter.
- Type the following command: sudo apt-get install wine
- Press Enter.
- Follow the prompts to complete the installation.
Step 3: Install PlayOnLinux
Next, you’ll need to install PlayOnLinux, which is a graphical front-end for Wine that makes it easier to install and manage Windows applications. Here’s how to do it:
- Open the Terminal app on your Chromebook.
- Type the following command: sudo apt-get install playonlinux
- Press Enter.
- Follow the prompts to complete the installation.
Step 4: Run iTunes Setup
We’ll utilise the compatibility application to run the iTunes setup file now that you have Wine installed and ready to go. To do so, use the following command in your Linux terminal, replacing “username” with the Linux username you created when you enabled Linux. Use the two commands listed below one after the other. If you renamed the iTunes setup file, make sure to update it in the command as well as your username. You will be prompted during the setup if “Auto run” is not activated. To enable that functionality, select Yes.
sudo apt update
WINEARCH=win32 WINEPREFIX=/home/username/.wine32/ wine iTunesSetup.exe


iTunes is now installed on your Chromebook, and the app icon should be visible on your app launcher. However, the path to the iTunes.exe file must be modified before Wine can open the application. To accomplish this, we must change the iTunes.destkop file. This may be found by accessing the Linux folder on your Files app. Select the “show hidden files” option from the three-dot menu in the upper right. Now, navigate to the following directories to locate the iTunes.desktop file.
Local>share>applications>wine>Programs>iTunes. To launch the text editor, right-click on the iTunes.desktop file and select “open with Text”. An Exec command should be on line three. Save the file after replacing all of line three(3) with the following text. Please replace “username” with your Linux username.
Exec=env WINEPREFIX=”/home/username/.wine32″ wine
“/home/username/.wine32/drive_c/Program Files/iTunes/iTunes.exe”
Step 5: Install iTunes on Chromebook via PlayOnLinux
Finally, it’s time to install iTunes on your Chromebook. Here’s how:
- Open PlayOnLinux on your Chromebook.
- Click on the “Install” button.
- Type “iTunes” in the search bar and press Enter.
- Select the iTunes installer file that you downloaded in Step 4.
- Follow the prompts to install iTunes on your Chromebook.
And that’s it! You should now have iTunes installed on your Chromebook and be able to access your music and other media content.
If you’re having issues with your DNS cache on Chrome, we’ve got you covered with a step-by-step guide to clearing or flushing it. And if you’re a gamer, be sure to check out our guide on installing and playing Minecraft on your Chromebook.
Using iTunes on Chromebook
Once iTunes is installed on your Chromebook, you can access your media library by launching PlayOnLinux and opening iTunes. You can play your music, watch movies, and manage your podcasts just like you would on a Windows computer. You can also sync your iPhone, iPad, or iPod with iTunes on Chromebook.
Alternative Ways to Access iTunes Content on Chromebook
If you do not want to go through the process of installing iTunes on your Chromebook, there are alternative options for accessing iTunes content. For example, you can use web-based music players such as Google Play Music or Spotify to listen to your music library. Another option is to upload your iTunes library to Google Drive and access it through the Google Drive app on Chromebook.
Conclusion
In conclusion, iTunes can be installed and used on a Chromebook with the help of Wine and PlayOnLinux. While the installation process may take some time, it provides access to your media library and allows you to sync your Apple devices. Alternatively, there are web-based music players and cloud storage options available for accessing iTunes content on Chromebook. With this guide, you can enjoy your media content on your Chromebook without limitations.
FAQs that may be helpful:
Yes, there are alternative options for accessing your iTunes library on a Chromebook such as using the Apple Music web app or using a third-party media player like VLC.
No, the iTunes store is not accessible on Chromebooks.
No, installing iTunes on your Chromebook does not void its warranty.
No, the Windows version of iTunes is not compatible with Chrome OS and requires the use of a Linux container.
It depends on the specifications of your Chromebook. Older or lower-end models may experience lag or slower performance when running iTunes.