Java is a popular programming language that is used to create a wide range of applications, from web applications to desktop applications. In order to run Java applications on your Windows 11 system, you need to have Java Runtime Environment (JRE) installed. In this article, we will provide a step-by-step guide on how to install Java JRE on Windows 11.
When Java JDK is installed on Windows 11, you will only find the Java JDK folder. The Java JRE is not included in the most recent version of the Java SE Development Kit (Java Runtime Environment).
If your project requires the Java JRE runtime environment, you can install it separately. It can be found on Java 8. It is a collection of software tools used to create Java applications. Here is a tutorial for setting up Java JRE on Windows 11.
How to Install Java JRE on Windows 11
If you plan to develop Java applications, you will need to install the JDK, which includes the JRE as well as additional development tools and libraries.
So, to summarize, if you only need to run Java applications on your Windows system, you can install the JRE without installing the JDK. If you plan to develop Java applications, you will need to install the JDK, which includes the JRE.
Step 1: Download the Java JRE Installer
The first step is to download the Java JRE installer from the official Oracle website. You can go to https://www.oracle.com/java/technologies/javase-jre8-downloads.html in your preferred web browser.
On the download page, look for JRE 8 and choose your operating system.

Step 2: Accept the License Agreement
Before downloading the Java JRE installer, you will need to accept the license agreement. Scroll down to find the “Accept License Agreement” radio button, select it, and then click the download button.
The x86 version of the software must be downloaded if your operating system is 32-bit. You must download the software’s x64 version for 64-bit (*** download the.exe file).

Step 3: Locate the Downloaded File
Once the download is complete, locate the downloaded file in your browser’s downloads folder. The file name will be similar to “jre-8u291-windows-x64.exe” depending on your system architecture.
Step 4: Run the Java JRE Installer
Double-click the downloaded file to run the Java JRE installer. A dialog box will appear asking if you want to allow the app to make changes to your device. Click “Yes” to continue.
Step 5: Follow the Installation Wizard
The installation wizard will guide you through the installation process. Follow the prompts to install the JRE on your system. By default, the JRE will be installed to the “C:\Program Files\Java\jre1.8.0_291” directory.

Step 6: Verify the Installation
Once the installation is complete, verify that the JRE is installed correctly. Open a command prompt and type “java -version” (without the quotes) and press Enter. The version of the JRE installed on your system should be displayed.
Congratulations, you have successfully installed Java JRE on Windows 11!
How to Setup Java JRE on Windows 11
Java JRE cannot be used simply by downloading and installing it. The Java JRE bin folder’s environment path variable needs to be configured.
The steps listed below can be used to configure the Java JRE environment variable:
Step 1: Locate the Java folder in the Program Files folder on C Drive and open it.
Step 2: Locate the jre1.8.0 291 folder inside the Java folder. Open it, then open the bin folder. Copy the path to the bin folder.

Step 3: For that, Go to Control Panel > System and Security > System > Advanced System Setting > Environment Variables
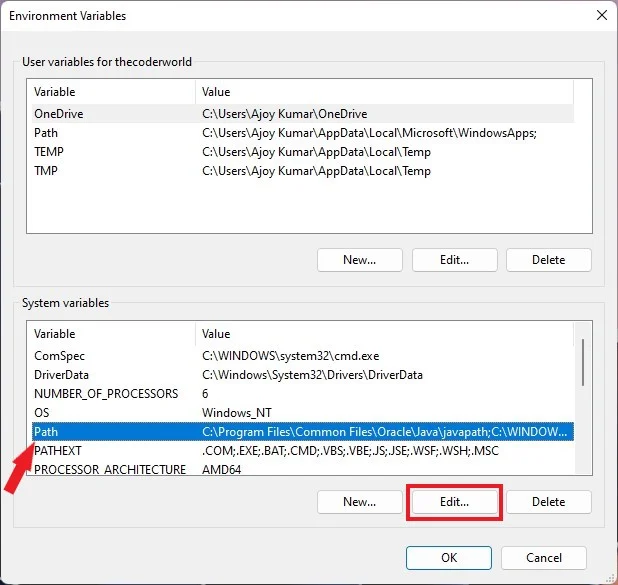
Step 4: PATH is listed as a system variable; simply pick it and choose edit. Next, select New and enter the location of the bin folder. Click the “OK” button after that.

Now to verify whether Java JRE was installed correctly or not. Run the following command after starting Command Prompt.
java -version
You may find out the Java JDK version and Java SE Runtime Environment build number by using the ‘java -version’ command. You can now utilise the Java JRE on Windows 11.
Java is a widely used programming language that is essential for running various applications on your Windows 11 system. In this article, we provided a step-by-step guide on how to install Java JRE on Windows 11. By following these simple steps, you can easily install Java JRE and start running Java applications on your Windows 11 system.
I hope you found this post to be useful. Share the article with your friends if you enjoyed it. Please feel free to post any questions or recommendations in the comments area.