

In today’s world, Chromebooks are used mostly by everyone, and they can do some pretty neat stuff. One super useful skill to have is knowing how to take a screenshot on a Chromebook.
Whether you’re just starting with a Chromebook OS ecosystem or coming back to this system after a break, you’ll find that the process of capturing screenshots on Chromebook is surprisingly simple.
Even though Chromebooks are mainly designed for the web, they’ve got your back when it comes to taking screenshots. You don’t have to hunt for extra apps or deal with complicated stuff – everything you need is right there. Your Chromebook comes with a built-in tool for taking screenshots.
In this guide, we’ll show you how to take a screenshot on a Chromebook, making it super easy to save files, important notes, or anything exciting you find online. So, let’s get started and become Chromebook screenshot experts!
How to Take a Screenshot on Chromebook
Taking a screenshot on your Chromebook is as easy as counting numbers 1,2,3! Let’s break it down step by step:
Step 1: First, make sure what you want to capture is on your screen.
Then, head over to “Quick Settings” and pick “Screen Capture.“
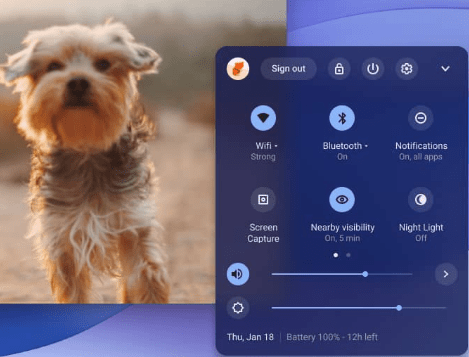
Step 2: Now, on the Screen Capture tool, decide what you want to capture –
- Your entire screen,
- Just one window or
- A specific part of your screen.
You can even record your screen using this Chromebook screenshot tool.
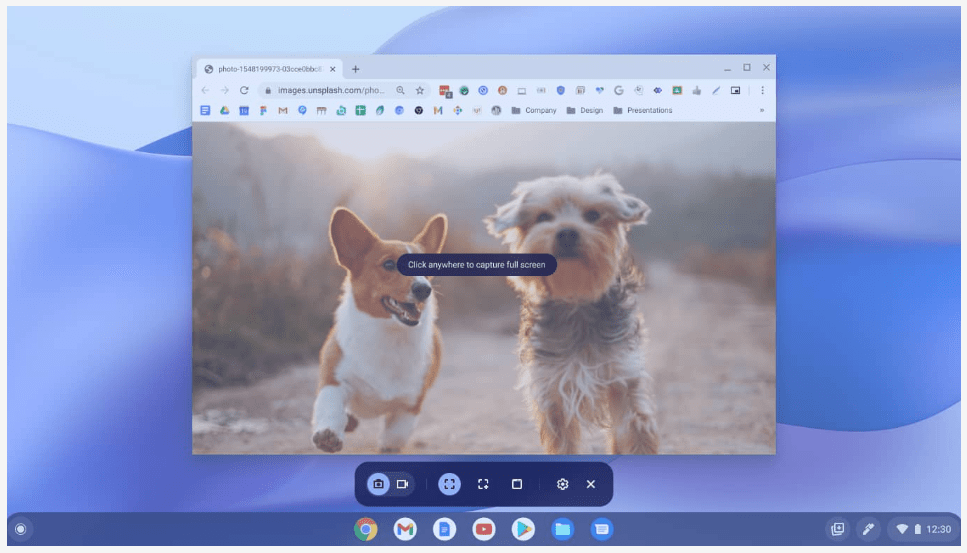
Step 3: Once you’ve made your choice, click “Capture” on the screen.

Step 4: Voila! Your screenshot or recording will appear in Tote on your shelf, and it’s also copied to your Clipboard automatically. Easy peasy, right?

Here are some helpful tips for taking screenshots on your Chromebook:
- If you want to change the part of the screen you want to capture, just tap the space bar on your keyboard.
- You can tweak the size of your screenshot too. To do this, use the Tab key on your keyboard to highlight one of the circle’s corners in the section.
- To change the height of your screenshot, press the Up or Down arrow keys on your keyboard.
- And if you want to change the width of your screenshot, use the Left or Right arrow keys on your keyboard.
- But wait, if you prefer using the screen menu, no worries! Simply select the time at the bottom of your screen and then choose “Screen capture.” It’s that simple!
If you’re looking for ways to enhance your Chromebook experience, check out our guides on Chrome Flags, which allow you to customize and improve your browsing experience, and also help you in changing your wallpaper with custom designs.
How to Take a Screenshot on a Chromebook Using the Keyboard Shortcut
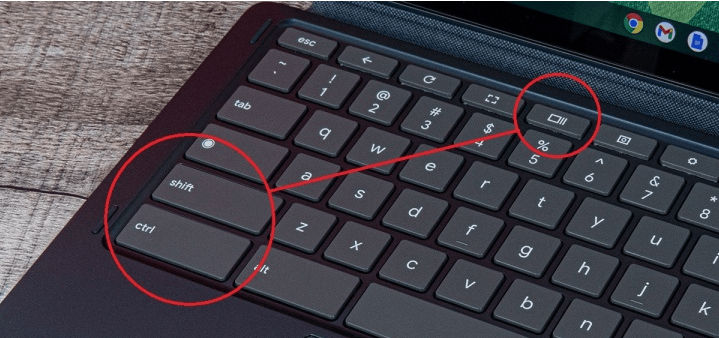
- Press the Shift + Ctrl + Show buttons on your Chromebook’s keyboard. The Show button looks like a rectangle with two vertical lines next to it.

- A menu will pop up at the bottom of your screen. From there, you can choose whether you want to capture the entire screen, a specific part of it, or just a window.
- If you’re using an external keyboard without the Show button, don’t worry! You can still access the screenshot menu by pressing Shift + Ctrl + F5.
With these keyboard shortcuts, capturing screenshots on your Chromebook becomes literally quick.
So Where to Find Your Chromebook Screenshots
To view all your saved Chromebook screenshots, you can check the Clipboard, Tote, and Download folder.
- Automatic Clipboard Copy: Your screenshot is automatically copied to your Clipboard. This means you can easily paste it into documents, emails, or any other applications where you can insert images.
- Tote: Your screenshots will also appear in Tote, a handy feature introduced in Chrome OS 89. You can access Tote from the Shelf, and it keeps important files, including screen captures, readily available.
- Downloads Folder: To easily locate your screenshots later, they are saved in your “Downloads” folder by default. If you’d like to change where they’re stored, you can do so by following these steps:
- Press Shift + Ctrl + Show windows.
- Select Settings > Select folder.
- Choose your preferred folder, and from then on, your future screenshots will be saved there.
Considering Chromebooks often have limited storage space, a smart option is to back up these images to Google Drive. This way, your screenshots become accessible across all your devices, providing a convenient and secure storage solution.
I hope this post will be extremely helpful to you.
Don’t Forget to Check Similar Posts on Chromebook:
How to Download and Install iTunes on Your Chromebook: A Step-by-Step Guide
How to Play Roblox on A Chromebook: The Ultimate Guide


